Saturday, September 17, 2016

APPLE CRISP PIZZA (low carb and gluten free)


I'm on an apple roll these days, Fall is in the air, and my house smells like apples.  I love it!!  Okay, I have to admit part of that apple smell comes from a room fragrance.  After my 3 jars of fermented apples were all done I made up a batch of my Fried Caramel Apples and I found a recipe on Taste of Home that I knew would be the perfect one to low carb using these apples. One problem was the crust.  Hmmmm, what would make a good crust.  I KNOW! I KNOW!  A version of  uplateanyway's stromboli crust!  I've made her stromboli and it's just too good. Really!  You have to try it! So for this I added a little sweetener to it.


Oh my oh my oh my!  This turned out so good.  I'm not kidding.  It's not as much work as it appears.  You do have to plan ahead for it though.  It takes 3 to 5 days to lacto-ferment the apples.  Then just make up a batch of the Fried Caramel Apples before you are going to do this, then all you have to do is make the crust...easy peasy, not as hard as it looks.  Tonight is pizza night at our house.  So I'll make my pepperoni pizza and then I'll have a slice of dessert pizza too.  I feel like I'm at a pizza buffet or something!  


Apple Crisp Pizza

Recipe By     :Ginny Larsen
Serving Size  : 12

 Crust
1 1/4  cups  part skim milk mozzarella cheese
1 tablespoon  Pyure sweetener
4 tablespoons  almond flour - Honeyville
3 tablespoons  coconut flour
4 tablespoons  Spectrum Organic All Vegetable Shortening, non-hydrogenated -- melted (OR butter)
1 egg

 Fried Caramel Apple Filling
2  tablespoons  butter
2  quarts  fermented apples -- *see recipe
1/4 cup  Pyure Sweetener
1 teaspoon  cinnamon
1/2 teaspoon  blackstrap molasses
1/2 teaspoon  Watkins Caramel extract
1/4 teaspoon  guar gum

Crisp Topping
3/4  cup  almond meal -- (place slivered almonds in food processor and process until it makes a coarse meal)
3 tablespoons  Pyure sweetener
1/4 teaspoon  blackstrap molasses
2 tablespoons  oat bran
1 teaspoon  cinnamon
1/4 cup  butter -- cold, diced

Glaze
1/4 cup  Pyure sweetener -- powdered in coffee grinder
3 tablespoons  heavy cream -- (OR as needed to get the right consistency)

Crust:  Melt shortening OR butter in microwave. Set aside

Combine Pyure sweetener with shredded cheese and melt in microwave about 2 to 2 1/2 min. at 30% power.

Add almond flour, coconut flour, melted butter, and egg to melted cheese and combine.  It will be really sticky and messy.  Put the whole thing back in the microwave for about 10 to 30 seconds more and mix together until it is well blended together and forms into a ball.

Roll out dough on parchment paper to fit your pizza pan.  Place parchment and dough onto pizza pan.

Fried Caramel Apple Filling: (Easier if you make this up ahead and have ready). In small frying pan, add butter and melt.  Add apples, sweetener, cinnamon, blackstrap molasses, and caramel extract.  Stir together and bring to boil.

Reduce heat and simmer, stirring, for about 10 minutes.  Sprinkle guar gum (if using) over all and stir in for another minute).

Crisp Topping: In food processor, add almond meal, Pyure sweetener, blackstrap molasses, oat bran, cinnamon, and butter.

Pulse until mixture is crumbly, but don't over process or you'll get a dough instead of crumbles.

Spread apples onto unbaked crust.  Top with crisp topping.  Preheat oven to 400F.  Bake 20 minutes.  Cool completely.

Glaze: In small bowl place powdered Pyure.  Add enough cream and stir until it is of drizzling consistency. Drizzle with a spoon over pizza.  Serve.

Copyright:
  "9/17/2016 http://ginnyslowcarbkitchen.blogspot.com"
                                    - - - - - - - - - - - - - - - - - - -

12 servings/Per Serving: (Not counting the apples, because I cannot know the carb count after they are fermented. Go by your meter) 200 Calories; 17g Fat (72.8% calories from fat); 8g Protein; 6g Carbohydrate; 1g Dietary Fiber

*editing this to say that the fermented apples raised me as much as a low carb vegetable would, like broccoli.  So I estimate about 5g carbs (no way of really knowing) when I use them in a recipe.  So in that case, this would come to about 11g total carbs.  But as I always say, your mileage may vary.  You can do your own test with a blood sugar meter.

Thursday, September 8, 2016

LACTO-FERMENTED APPLES and FRIED CARAMEL APPLES


Yes Virginia! You can have your apples and eat them too!  I've posted previously about fermented apples and the effect they have on my blood sugar.  Well that was way too long ago and I never did get back to it, or make another apple pie or decide on a good crust for it.  So I apologize to those who were looking forward to that!!  It's apple season once again and I'm interested in apples.  So I made a video to show you, first of all, how to ferment the apples. Some people add salt, but if you use fresh whey from kefir or homemade yogurt, you don't have to add salt.  They turn out lovely without and you don't have salty apples then.

Crust ideas anyone?  It needs to be a crust that will not get soggy when baked with the apples.  If you have a good one feel free to share it in the comments.  If you want to benefit from the pro-biotics then eat these as is without heating them.  I sprinkle a little sweetener and cinnamon on them and just eat them as a side dish.


SEE IT BETTER ON YOUTUBE: https://youtu.be/1GdSN9SGiBo
                   

Fried Caramel Apples


Recipe By: Ginny Larsen
Serving Size  : 4  

1 tablespoon  butter
2 cups  (1 jar) fermented apples -- diced  (nutritional information not given because I really have no way of knowing the carb count once they are fermented! I go by my meter)
2 tablespoons  Pyure sweetener
1/2 teaspoon  cinnamon
1/4 teaspoon  blackstrap molasses
1/4 teaspoon  Watkins Caramel extract
1/8 teaspoon  guar gum -- (optional - if you want it thickened more)

In small frying pan, add butter and melt.  Add apples, sweetener, cinnamon, blackstrap molasses, and caramel extract.  Stir together and bring to boil.

Reduce heat and simmer, stirring, for about 10 minutes.  Sprinkle guar gum (if using) over all and stir in for another minute).


Copyright:
  "© ginnyslowcarbkitchen.blogspot.com - 9/7/2016"
                                    - - - - - - - - - - - - - - - - - - -

*Apples not included - remaining ingredients per serving: 27 Calories; 3g Fat (92.5% calories from fat); trace Protein; trace of Carbohydrate; trace Dietary Fiber

Serving Ideas: This is wonderful as a treat by itself hot or cold.  Add whipped topping, or yogurt, or spoon over ice cream.  Use it for a pie filling.  For a 9-inch pie you would have to double the recipe.


Wednesday, September 7, 2016

CRANBERRY-CHEESE BREAD


Even though it does not feel like a Fall day, my mind is in "Fall mode" today, and I'm looking forward to cool crisp air once again, and thinking about Fall foods.  This was my last bag of cranberries from the last cranberry season, actually.  I had bought several and kept them in my freezer.  I decided I better find a way to use them today.  I was going to do a search for a good cranberry bread recipe online but decided to just see what I could do with converting a Betty Crocker recipe.  I still have my very old Betty Crocker cookbook, believe it or not! It was a wedding gift that I've treasured through the years and learned to cook with.  The cover is duct taped together and some of the pages are falling out, but I still refer to it often!  Many of the recipes are so easy to convert.


I love my silicone bread pan and that's what I used to bake this in.  I think it works best if you happen to have one.  Comes out nice and easy.  As I always do when I make a new recipe, I say a prayer that it turns out good.  I've had too many flops with bread or cake recipes.  And all those expensive ingredients go to waste!!  But I was very pleasantly surprised how well this turned out.  It is so good. I love the color and flavor the cheese adds to it.  I could not be more happy with this bread.  If you try it, I hope you will enjoy it.

P.S. My hubby (non-low-carber) just took a piece and said, "I like it.  It's good."  There ya go... you can't get a better review than that.
                   

Cranberry-Cheese Bread

Recipe By Ginny Larsen

Serving Size: 16  

FLOURS
1  cup  almond flour - Honeyville
1/2  cup  golden flaxseed meal
1/4  cup  oat fiber -- (*distinct from oat bran-see note below)
1/8  cup  coconut flour
  ---------------------------------------------------------------------------------------                  
1/2  cup  Pyure Sweetener -- OR other granulated sweetener to equal 1/2 cup sugar
1 1/2  teaspoons  baking powder
1/2  teaspoon  baking soda
1/2  teaspoon  salt
2  tablespoons  Spectrum Organic All Vegetable Shortening, non-hydrogenated -- (OR unsalted butter)
-------------------------------------------------------------------------------------
WET INGREDIENTS
3  large  eggs
1/4  cup  water
1 squeeze  MIO Orange Vanilla flavored water inhancer -- OR 1 tsp orange extract + 1/4 tsp Stevia extract (GV brand at Walmart) or other liquid concentrated sweetener to equal 1/4 cup sugar.
---------------------------------------------------------------------------------------                      
1 1/2  cups  Sharp Cheddar, Finely Shredded, Happy Farms -- 6 oz.
1 cup  cranberries -- halved
1 tablespoon  Pyure sweetener
----------------------------------------------------------------------------------------
Preheat oven to 350F. Grease 9 x 5 x 3-inch loaf pan (Silicone works best if you have it).

In mixing bowl, add almond flour, flaxmeal, oat fiber, and coconut flour.  Stir to combine.

Add Pyure Sweetener, baking powder, baking soda, and salt.  Stir together.

Add vegetable shortening and blend in with fingers or cut in with pastry blender until crumbly.

In small bowl add eggs, water, and orange flavoring.  whisk together.  Pour into dry ingredients.

Add cheese and cranberries and stir together until combined.  Dough will be stiff.  Sprinkle Pyure sweetener over the top before baking. Bake 60 to 70 minutes.  Mine took 70.  Let cool slightly and remove onto wire rack.  Let stand for several hours before cutting.

OPTIONAL:  Add chopped walnuts or pecans if desired, with the cranberries.
May add 2 tsps. grated orange peel if desired.

*NOTE: Most Oat fiber is not gluten free, however if you are gluten free I found a brand that is on Amazon. If you prefer not to use oat fiber, add 1/8 cup more of coconut flour instead.

Copyright:
  "© ginnyslowcarbkitchen.blogspot.com - 9/7/2016"
                                    - - - - - - - - - - - - - - - - - - -

Per Serving: 131 Calories; 11g Fat (63.1% calories from fat); 6g Protein; 8g Carbohydrate; 6g Dietary Fiber

NOTES : 2g net carbs per slice of 16 slices

*Brands are just what I use, and the nutrition info is based on that.  If you use different brands, adjust accordingly.


Friday, September 2, 2016

Avocado Pesto With Zucchini Pasta


This recipe was not my original idea.  I saw this video on facebook and then sort of decided just to improvise and adapt it to my own liking. It's pretty much a whole different recipe than the original.  I had some leftover chicken I needed to use up, and I decided to add some bacon and my own seasonings.  You could easily just make the avocado pesto and mix it with the zoodles for a delicious side dish as well.  I loved loved loved this!  I have had to grow into liking avocado.  There are only certain ways I'll eat it.  So I was a little hesitant to try this, but I did, and am so glad! I felt like I was eating a very scrumptious pasta dish at a fancy Italian restaurant.  It was very filling! I made this for 1 serving, and it is a very hearty 1 serving at that!

The picture is actually taken after I ate about a third of it!  I had not intended to make a post out of this but it was so good that I decided on the spur of the moment to take a quick picture and post.


Avocado Pesto with Zucchini Pasta

Recipe By     :Ginny Larsen
Serving Size  : 1  

2.5 ounces  avocado (or 1/2)
1  tablespoon  lemon juice
1  teaspoon  olive oil
1  teaspoon  Basil Pesto, Mezzetta Napa Valley Bistro
1/4  teaspoon  salt -- or to taste
1/4  teaspoon  onion powder
1/4  teaspoon  garlic powder
2 slices  Center Cut Bacon, Specially Selected
3.6  ounces  chicken breast -- cooked and diced
6.6  ounces  zucchini -- made into "zoodles"

In small bowl add avocado, lemon juice, olive oil, basil pesto, salt, onion powder, and garlic powder.

Mash with a fork and mix together until creamy.

In frying pan, sprayed with non-stick spray, add bacon and cook until crispy.  Break into pieces and add chicken breast and heat together until chicken is warmed.  Add zucchini noodles and avocado pesto mixture, and stir together, cooking for a couple minutes until "zoodles" are tender but do not overcook until soggy!  You want them to resemble al dente pasta.

Source:
  "adapted from http://allrecipes.com/recipe/246342/avocado-pesto-with-zucchini-pasta/"
                                    - - - - - - - - - - - - - - - - - - -

356 Calories; 24g Fat (60.4% calories from fat); 25g Protein; 11g Carbohydrate; 3g Dietary Fiber

NOTES : Nutritional info is based on what I used.  If you use different amounts be sure to adjust.


Friday, July 29, 2016

ZUCCHINI BREAD OR CAKE


I've been thinking of zucchini bread lately, since there is lots of zucchini available right now.  One year I grew my own...just 2 plants and I had zucchini coming out of my ears all summer!  I had to figure out what to do with it all.  So this recipe was handed to me from a friend who got it from a friend who got it from a friend... you get the picture.  It's one of those recipes that was brought to potlucks at church and passed around.  Those are the best kind of recipes, in my opinion.  They are the tried and true family recipes that get used over and over again. It was the best zucchini bread/cake recipe I ever tasted in my life.  Truly. I lie not.  So I decided instead of looking up a low carb recipe out there I would see if I can take this recipe and adapt it to low carb.


It is not, however gluten free, but can easily be made gluten free by just changing the flour mixture up a bit.  I have been experimenting with oat fiber (which is not certified gluten free) and with einkorn flour, which is an ancient wheat.  So far I have had no reaction from them, so I'm encouraged.  I don't plan to use them on a regular basis, but I'm happy I can occasionally use them in a recipe without any adverse effects.  You can replace this in the recipe for more almond flour and I'd add a tsp of xanthan gum if not using the oat fiber.  I have not tested it that way, so you're on your own, but that is what I would do if making it gluten free.

This turned out to taste every bit as good as the original!  I am happy, happy, happy!  I have had a few flops in the kitchen lately, which makes me very upset.  But this made me extremely happy.  Hubby, who is a non-low-carber liked it.  Thought it was very good.  To me it tasted exactly like I remember.  It is very moist, but not gooey in the middle.  It is just right.  It's just how I remember.  I hope if you try it you will enjoy it also.


Zucchini Bread or Cake


5  large  eggs
1/2  cup  erythritol
1/4  cup  Pyure
2  teaspoons  vanilla
1  teaspoon  baking soda
1/2  teaspoon  baking powder
1  tablespoon  cinnamon
1/2  teaspoon  salt
2 cups  shredded zucchini -- (I cut one large zucchini in chunks and place in food processor with S blade and process.)
1/3  cup  coconut oil
1 1/2  cups  almond flour - Honeyville
1/4  cup  whey protein isolate, Isopure -- unflavored
1/4  cup  golden flaxseed meal
1/4  cup  oat fiber
1/4  cup  einkorn flour

In mixing bowl, add eggs, erythritol, Pyure, vanilla, baking soda, baking powder, cinnamon, and salt.  Blend together with electric mixer.

Add Zucchini, oil, almond flour, whey protein, flaxseed meal, oat fiber, and einkorn flour.   Mix until combined.

Pour into Bundt pan, sprayed with non-stick cooking spray, and bake in 350F preheated oven for 1 hour to 1 1/4 hr. If knife inserted comes out clean it is done. It was done for me at 1 1/4 hour.

Cool completely on wire rack.  Turn out onto plate and add a glaze if desired.


Yield:
  "1 loaf"
                                    - - - - - - - - - - - - - - - - - - -

16 slices/Per slice: 146 Calories; 12g Fat (64.7% calories from fat); 6g Protein; 8g Carbohydrate; 6g Dietary Fibe

Net carbs: 2g per slice if 16 slices

Serving Ideas : If desired glaze with 1/4 cup powdered Pyure or powdered granulated sweetener of choice to equal 1/2 cup sugar.  Add 1/2 tsp. vanilla extract and gradually add heavy cream while whipping until it is the right consistency of a glaze.
Pour over top of cake and let it dribble down the sides.  Add carbs and calories according to how much cream you use.


Thursday, July 14, 2016

CHEESY HASH BROWN SPAGHETTI SQUASH CASSEROLE


This is an old recipe revisited using spaghetti squash in place of turnips for a hash brown casserole.  I had a spaghetti squash I needed to us and I wondered how it would work in this recipe.  It came out fantastic!  Definitely a keeper in our house.  I have to say it will not resemble a potato hash brown casserole.  It is what it is - a spaghetti squash hash brown casserole.  If you love spaghetti squash you'll love it.  If you are looking for something to taste more like a potato then go for the turnip original recipe.  I'm thinking you could even do shredded cauliflower as well in this recipe and get a wonderful dish.  Either way you choose to do it, is your preference.  I like all three.  I've done it all three ways.  I can't say which is my favorite.  It just depends on what you are in the mood for or what your likings are.

Below, is the original recipe with turnips.  To make it with spaghetti squash, simply cook one medium spaghetti squash by slicing it in half, removing the seeds, and placing it face down on a cookie sheet with a little water around it. Bake at 400F for 30 minutes.  You don't want it too done or mushy.  When cooked, let cool and until easy to handle and scrape out with a fork all the spaghetti strands.  Place them in your casserole dish and add the remaining ingredients following directions below.  The nutrition info for making it with spaghetti squash is: 251 Calories; 22g Fat (76.5% calories from fat); 11g Protein; 4g Carbohydrate; trace Dietary Fiber for 4 servings, but we actually got more than 4 servings out of this so you would have to figure it out according to how many servings you have.  The entire recipe would be: 1005 Calories; 87g Fat (76.5% calories from fat); 45g Protein; 15g Carbohydrate; trace Dietary Fiber
You may want to add more cheese for an even cheesier casserole.

Editing my post 8/12/2017 to post a link to a very helpful blog I made aware of that has a very thorough list of helps for cooking spaghetti squash.  Check it out!! As well as some of the other tips and recipes. I think you'll find it helpful, especially if you've never tackled a spaghetti squash before: https://www.quickeasycook.com/spaghetti-squash/

CHEESY HASHBROWN TURNIP BAKE                     

1 pound  turnips -- shredded
1/2 cup  fiesta blend shredded cheese
1/2 cup  Parmesan cheese
2 large  eggs -- beaten
1 teaspoon  garlic powder
1 teaspoon  onion powder
Salt and pepper -- to taste
1/4 cup  butter -- melted

Preheat oven to 400 F.  In 9 x9-inch glass baking dish, sprayed with non-stick cooking spray, add shredded turnips, fiesta blend cheese, Parmesan cheese, eggs, garlic powder, onion powder, and salt and pepper.  Mix together.  Pour melted butter over all and mix in.  Bake 30 minutes or until lightly browned.

4 Servings/Per Serving: 254 Calories; 20g Fat (71.8% calories from fat); 11g Protein; 7g Carbohydrate; 2g Dietary Fiber;

Friday, July 8, 2016

S'MORES NO-BAKE CHEESE CAKE


I'm so excited about this recipe! I was literally dreaming about this today, and it all came together in my mind and sounded so good in my head that I thought I'd do a video of it while creating it.  I was not disappointed!  My family loved it!  Yes, even the non-low carbers.


The crust tastes very much like a graham cracker crust, albeit a low carb gluten free version, as far as I remember them, which was many moons ago.  You will have to make up your mind on that.  This is my favorite crust and I use it for most of my cream pies.

I'm not the queen of low carb bloggers out there, but hey, I make some mighty good food!  We enjoy it anyway.  I have to say this one is up there on the top of my desserts now.  It's pretty easy to put together too, as you'll see demonstrated in the video.


S'MORES NO-BAKE CHEESE CAKE

                     
CRUST
1 cup  almond flour - Honeyville
1/2 cup  golden flaxseed meal
1/3 cup  whey protein isolate, Isopure -- either unflavored or vanilla
1 tbsp Pyure sweetener (2 tbsp equivalent)                   
1/4 cup  coconut oil -- melted
1 teaspoon  vanilla extract
2 tablespoons  Torani sugar free s'mores flavored syrup -- (available at Walmart) if you can't find it use vanilla flavored
FILLING
12 ounces  Philadelphia 1/3 less Fat Cream Cheese, softened -- (you may use full fat, but I use this because it actually has less carbs and calories.)
1/4 cup  Pyure Sweetener -- Or sweetener of choice (equal to 1/2 cup sugar)
3/8 cup  Torani sugar free s'mores flavored syrup
1 teaspoon  vanilla extract -- OR if you have it 16 drops Marshmallow flavor concentrate (Capella)
1/8 teaspoon  salt
1 cup  heavy cream
1 tablespoon  vanilla instant pudding mix, sugar free
TOPPING
7 5/8 ounces  Nestle Media Crema (Table Cream) -- OR 2/3 cup heavy cream
3  tablespoons  Pyure Sweetener -- powdered (equivalent to 3/8 cup sugar)
1  tablespoon  xylitol sweetener -- powdered
8  squares  Lindt 85% Cocoa Bar -- chopped into small pieces

CRUST: Preheat oven to 350F.  Grease a 10-inch springform pan or 9x13-inch pan.  

In springform pan, add almond flour, flaxseed meal, whey protein isolate, and Pyure, and stir together with a fork.  Add coconut oil, vanilla extract, and sugar free syrup.  Stir together with fork until crumbly.

Press into pan.  To keep it from sticking to your fingers, spray a piece of plastic wrap with non-stick cooking spray and press down into pan and part way up sides.

Bake 10 minutes and let cool completely on a wire rack.

FILLING: In mixing bowl add cream cheese, granulated sweetener, sugar free syrup, vanilla extract, and salt.  Mix with electric mixer until smooth and creamy.

In another mixing bowl, add heavy cream and vanilla pudding mix.  Whip until stiff peaks form.

Pour whipped cream into cream cheese mixture and continue mixing with electric mixer on low speed until completely combined.

Pour into cooled pie crust.  You can chill this in the refrigerator if you have a lot of time, or you can put it in the freezer for 1 hour, before adding the topping.

TOPPING:  In sauce pan, add table cream and powdered Pyure sweetener and powdered xylitol.  Stir. Bring to simmer stirring constantly.

Add chocolate pieces and let sit 1 minute.  With wire whisk or electric hand whisk, whisk until smooth and creamy. Immediately pour over filling and freeze 1 hour or chill several hours.

Keep refrigerated.

Copyright:
  "© Ginny's Low Carb Kitchen, 7/8/2016"
                                    - - - - - - - - - - - - - - - - - - - 

16 servings/Per Serving: 260 Calories; 23g Fat (78.6% calories from fat); 6g Protein; 8g Carbohydrate; 3g Dietary Fiber

NOTES : 5g net carbs per 1/16 serving


Saturday, June 11, 2016

FUDGESICLE-MUFFINS


♫Roll out those lazy hazy crazy days of summer♫
♫you'll wish that summer could always be here♫'


Yes, here it is on June 11, barely after a very chilly April and May, we are up to almost 90 today, and it is time for something cold.  Well, to me chocolate, and frozen, and fudgie all sounded very very good today.  These are every bit as fudgie and rich and wonderful as anything you've ever gotten in the grocery store or anywhere else.  They are fantastic!  I could have put them in my popsicle molds but that would have made them 4 larger ones, and I made 8 smaller ones instead, cutting the carbs and calories in half.  Yes, these are rich, and so no need to have a big one.


Next time I would work on cutting the carbs, but today I just enjoyed it.  You can cut the carbs more by not using xylitol.  I used it because it makes chocolate taste so wonderful.  But you can leave it out altogether for less sweet, or add more of another sweetener in its place.  Xylitol does have carbs, but not as much as sugar.  I use it sparingly now and then.  It will give you 3g less in each one if you cut it out.

I have silicone muffin liners which you can get at Walmart very inexpensive. Or if you have a silicone muffin pan use that. Silicone is just easy to pop them out of.

My hubby enjoyed his tonight.  Just enough for an after dinner refreshing dessert.


 FUDGESICLE-MUFFINS


1/4 cup  butter -- (grass-fed if possible)
1 cup  chocolate almond milk, unsweetened
2 tablespoons  Pyure Sweetener -- OR  equivalent of 1/4 cup sugar, powdered
2 tablespoons  xylitol sweetener
10 squares  Lindt 85% Cocoa Bar -- chopped in small pieces, 1 full bar
1 teaspoon  unflavored gelatin
1/4 teaspoon  xanthan gum
2 teaspoons  vanilla extract

In sauce pan, add butter and melt.  Carefully pour in almond milk and stir together.  Add Pyure and xylitol.  Bring to boil and add chocolate bar. Stir until chocolate is melted.

Add unflavored gelatin and stir in well, until dissolved.  While whisking vigorously slowly add xanthan gum.  Add vanilla extract and continue whisking (can use electric mixer but be careful as it is hot!)  Whisk until very smooth and creamy.

Let cool until just warm.  Line 8 muffin tins with silicone muffin liners.  Pour into liners. Place popsicle sticks in center of each and pop in freezer.  Freeze several hours or until hard.

  "© Ginny's Low Carb Kitchen"
                                    - - - - - - - - - - - - - - - - - - -

Per Serving: 142 Calories; 12g Fat (70.9% calories from fat); 2g Protein; 9g Carbohydrate; 2g Dietary Fiber

NOTES : * to reduce it by 3g carbs, replace xylitol with erythritol or add more Pyure.


Friday, May 27, 2016

MONTE CRISTO SANDWICH, LC, GF


I have good memories of when I was first engaged to my husband of almost 42 years now, of eating at Perkins restaurant and having their Monte Cristo Sandwich.  I was hooked on it.  Many times I've tried to replicate it since being low carb. This was a delightful reminder of it and tasted so much like what I remembered.  Sometimes food brings good memories to us.  We tend to associate food with certain feelings and happy thoughts, so that food somehow ends up sort of a comfort food to us.  This is one of the hardest thing for dieters, or anyone having to change their diet and lose those certain foods.  It's not that I cannot be happy without food, or that I HAVE to have it, but I believe God gave us food to enjoy and even to commemorate certain times in our lives. If not, why did He give us taste buds?  One more proof to me of His love for His own.  And memories are important and should be kept. We had many delightful times of getting to know each other over a Monte Cristo sandwich.

I've made some Monte Cristos in the past but none as good as this one. I hope others will find it a delight to their taste buds and a help to their diet, as I have.  It made a very filling lunch for me, and I needed nothing else.

I used Walden Farms Strawberry syrup which claims zero calories, and carbs both, which I cannot comprehend, but I love the taste of this syrup nonetheless.  If you don't like to use this kind of product you can make your own syrup easily enough by using just frozen strawberries and thickening the berries and juice over heat with either arrowroot powder or xanthan gum. Or just use plain strawberries sweetened with your favorite sweetener.


MONTE CRISTO SANDWICH   

                        BREAD
2 tablespoons  Parmesan cheese -- (fresh grated or from the can)
1 tablespoon  almond flour - Honeyville
2 tablespoons  Pyure Sweetener -- (OR equivalent of 1/4 cup sugar)
1 teaspoon  psyllium husk powder -- (I grind fresh husks in coffee grinder)
1/4 teaspoon  baking powder
1 egg
1 tablespoon  Silk unsweetened almond milk, vanilla -- (Can use any liquid but this gives it the vanilla flavor as well)
                        FILLING
3 slices  chicken breast, Lunch Mate Premium
3 slices  hickory smoked deli ham slices, Lunchmate (aldi's)
1 slice  Smoked Gouda, Happy Farms deli sliced
                        BATTER FOR DIPPING
2 tablespoons  heavy cream
1 teaspoon  vanilla extract
1 egg
1/2 tablespoon  Pyure sweetener -- (OR equivalent of 1 tablespoon sugar)
                        TOPPING
1 large  strawberry -- sliced
2 tablespoons  Walden Farms Strawberry Syrup

In small bowl add Parmesan cheese, almond flour, Pyure sweetener*, psyllium powder, and baking powder.  Whisk together.

Add egg and almond milk and whisk until well combined and creamy smooth.

Pour into square microwaveable container and microwave on high approximately 1 min. 40 seconds, but your microwave may vary.  Make sure it is done in the middle but not over done on the sides.  My microwave is 1000 watts.

Remove and let cool.  Slice horizontally in two.  On one half add 3 slices of chicken breast, 3 slices of ham, and top with smoked Gouda slice. Cover with other slice of bread.

In a cereal bowl add heavy cream, vanilla extract, egg, and Pyure sweetener. Whisk until smooth and well blended.

Dip sandwich into batter and let sit on one side for a few seconds to absorb.  The flip over onto the other side and let sit a few more seconds to absorb the liquid.  You will have some batter left, so the exact count will be somewhat different if you don't use all the batter.  I put the full count of the batter in the nutritional information, but you can adjust as you need to.

Melt a tsp. of butter in frying pan.  Place dipped sandwich into frying pan and cover.  Cook on one side about a minute on medium low heat.  Make sure it does not burn.  Flip to the other side and do the same.

Place on a serving plate and top with strawberry topping. Pour a little more syrup over all if desired.  Sprinkle with powdered Pyure or erythritol, as desired or top with whipped cream.

STRAWBERRY TOPPING: In small bowl add strawberry slices.  Add syrup and stir together.

Source:
  "http://ginnyslowcarbkitchen.blogspot.com"
Copyright:
  "© Ginny Larsen, 5/27/2016"
                                    - - - - - - - - - - - - - - - - - - -

1 Serving: 530 Calories; 39g Fat (65.5% calories from fat); 34g Protein; 11g Carbohydrate; 5g Dietary Fiber

NOTES : 6g net carbs

*Pyure Sweetener is a combination of stevia and erythritol and is available at Walmart and most grocery stores. It measures twice the sweetness of sugar so if you would use 1 tbsp sugar you would use 1/2 tbsp of Pyure.


Monday, May 2, 2016

BACON CHEESEBURGER PIE


I love bacon cheeseburgers so why not make it easy and do it all up in a pie plate?  I wasn't quite sure how to go about it.  I thought of the "Impossible Cheeseburger Pie" recipe from Bisquick and thought maybe I'd try to take that and do a low carb version.  Then I thought of my bun recipe and thought why not just make the batter for that and pour it on top?  That's what I ended up doing and I love the way it turned out.  Then the burger part...what do I like on my burgers?  Plus, ya gotta have that smokey grilled flavor right?  So all in all I put it all in a pie and loved the way it turned out and so did my family.  I hope you'll enjoy it as well. The pictures were taken in haste as an after thought, unfortunately when most of the pie was gone already!  So they aren't tops, but you get the idea of what it looks like.


                        BACON CHEESEBURGER PIE

Recipe By     :Ginny Larsen
Serving Size  : 8  

6  strips  Center Cut Bacon, Specially Selected
1  pound  ground beef, Simply Nature, 100% grass fed
1/2  cup  diced onion
1/2  cup  dill pickles -- diced
2  tablespoons  reduced sugar ketchup, Heinz
1  teaspoon  worcestershire sauce
1  teaspoon  apple cider vinegar
1  teaspoon  Wright's liquid smoke
1  cup  Sharp Cheddar, Finely Shredded, Happy Farms
TOPPING
6  tablespoons  Parmesan cheese
3  tablespoons  almond flour - Honeyville
1  tablespoon  psyllium husk powder
1  tablespoon  nutritional Yeast Flakes, NOW brand
3/4  teaspoon  baking powder
3  eggs
3  tablespoons  liquid -- (I use marsala cooking wine, for the flavor and aroma, you can use any liquid of choosing.)

Preheat oven to 400F. Grease 10-inch pie plate or 9 x 9-inch square pan.

In skillet, fry bacon slices, drain, and set aside.

In skillet break up beef and add and onion.  Cook stirring until meat is browned and onion is cooked. Drain fat and stir in pickles.

In small bowl add ketchup, Worcestershire sauce, vinegar, and liquid smoke.  Stir together and stir into meat.

Pour mixture into pie plate or square pan.  Break up bacon in pieces and sprinkle on top. Sprinkle cheese over the top.

TOPPING: In food processor add Parmesan cheese, almond flour, psyllium husk powder, nutritional yeast flakes, and baking powder. Process for a few seconds to sift together.

Add eggs and liquid and process until smooth. Pour evenly over the pie.  Bake 25 minutes or until lightly browned on top.

Copyright:
  "© Ginny Larsen 4/22/2016"
                                    - - - - - - - - - - - - - - - - - - -

Per Serving: 271 Calories; 19g Fat (61.6% calories from fat); 21g Protein; 5g Carbohydrate; 2g Dietary Fiber

Serving Ideas : Wonderful served with just a side salad


Sunday, April 3, 2016

MY COCONUT BOMBS


I was talking to a friend in church this morning about my coconut bombs that I have been making for my hubby.  So I decided it's time again to come home and make some and share the recipe.  Coconut is great for Alzheimer's and any brain issues, or memory loss.  We still are not sure what he has is truly Alzheimer's or if it is not caused by another source.  But we've actually been seeing some improvements.  He does Lumosity every day and has improved his scores.  His last appointment at the memory clinic at the VA his score improved by 1 point.  I didn't think much of that until she told me most with his diagnosis (Mild Cognitive Impairment-possible Alzheimer's) show a steady decline by at least 2 points each 6 months that they come in to be tested. So it was VERY encouraging that he actually has for the last 2 times improved 1 point each time.  She did not want to put him on the medicines because of the serious side effects since he is showing improvement with what we are doing.  What are we doing?  He's receiving Vitamin E which has been shown to improve memory issues in studies that were done.  He's receiving MCT oil along with a B12 complex, plus MSM which also has been shown to clear plaques in the brain.  His last Cat Scan showed plaques in the brain, so this is essential.  He's also taking Magnesium Threonate, a special type of magnesium that helps brain function, Krill oil, a strong source of Omega 3, and CoQ10, Vit. D, a cognitive formula and a probiotic.  We definitely see improvement when he takes these regularly, and we definitely see problems when we've forgotten them some days.   And, I give him these coconut bomb treats now and then as well as trying to use coconut oil in anything I can.

There are many versions of coconut bombs all over the internet, and I decided not to look at them but just to create my own version.  So if it is similar to someone else's it is purely by accident.  Great taste buds think alike. This is my version, and we love it.  It's very rich and one is very filling.

                   
COCONUT BOMBS


 1/2  cup  coconut oil
 1/4  cup  Pyure -- powdered (equivalent to 1/2 cup sugar)
 1/4  teaspoon  stevia extract, GV brand from Walmart (1/4 cup equivalent)
 1/2  teaspoon  coconut extract
 1/4  teaspoon  rum extract
 1/2  cup  shredded coconut, unsweetened, Bob's Red Mill

 CHOCOLATE COATING

 1/4  cup  coconut oil
 2     tablespoons  cocoa powder
 3 Tbsp Pyure -- powdered (1/3 cup equivalent)

In a small bowl combine coconut oil, Pyure, stevia extract, coconut extract, and rum extract. Whip together until fluffly with electric mixer.

Add shredded coconut and mix in completely.

With a small 2 tbsp meatball scoop, scoop out 10 balls and place in container lined with wax paper. Freeze for 30 minutes.

Meanwhile make Chocolate coating: In saucepan, add coconut oil, cocoa powder, and sweetener. Heat just untl melted, stirring constantly.  Remove from heat and place in a small bowl.

Dip each ball into chocolate and place back onto wax paper and chill in refrigerator.

Variation: For a quicker chocolate coating, melt sugar free chocolate chips or semi-sweet chips. 200 cal., 20g fat, 7g carbs, 1g fiber per piece.

                                    - - - - - - - - - - - - - - - - - - -

10 balls, 1 ball per serving: 170 Calories; 19g Fat (95.3% calories from fat); trace Protein; 2g Carbohydrate; 1g Dietary Fiber


Check out my other blog: Living Scriptures Devotional blog


Wednesday, March 9, 2016

CRISPY CHOCOLATE CHIP PEANUT BUTTER COOKIES, LC, GF


My husband likes cookies. I like cookies. My son likes cookies.  Cookies can be a problem, because they usually add unnecessary sugar, and bad fats to your diet.  They usually put on weight. They usually make you feel really crummy for having eaten them - unless you use healthy fats that are actually beneficial to you and healthy sweeteners so you are not spiking your blood sugar. We love peanut butter and we love chocolate.  Chocolate chips tend to be not so good on a low carb diet, unless you find some that are truly sugar free (meaning no malitol or bad sugar alcohols or other hidden types of sugar), or unless they are dark chocolate and low enough in sugar that you can take a small amount, put them in your food processor and make them into smaller chips.  I did that with Nestle's dark chocolate morsels which have the same amount of carbs of every "sugar free" type of chocolate chips I've found...at least the ones that are affordable, easy to find, and you don't have to pay an exorbitant price for as well as shipping. Hate that.  Gets so that it costs a small fortune to have a treat if you are low carb and gluten free sometimes.


I miss the days when you could easily throw together easy to get, cheap to buy ingredients and make a quick treat.  Well, maybe it's just as well, because treats, whether low carb, or not, are supposed to be just that - treats! Meaning, once in a while, not every day, every meal.  So before I go rambling on anymore, here is a video I put together to show how I converted a very classic peanut butter cookie recipe and made it simply low carb.  I realize it is not ingredients everyone has on hand, but if you are a low-carber by lifestyle, you will have these ingredients on hand.

I used Jennifer Eloff's bake mix in this recipe which you can find here
If you don't use it you can just use more almond flour instead.


View on YouTube: https://www.youtube.com/watch?v=QtaXo2xhM5w&feature=youtu.be
                   

CRISPY CHOCOLATE CHIP PEANUT BUTTER COOKIES, LC, GF


1/4  cup  Spectrum Organic All Vegetable Shortening, non-hydrogenated
1/4  cup  butter
1/2  cup  natural peanut butter
1/4  cup  Pyure Sweetener -- OR 1/2 cup equivalent to sugar
1/2  cup  erythritol
1     teaspoon  blackstrap molasses
1     egg
1     cup  almond flour - Honeyville
1/4  cup  Jennifer's bake mix
3/4  teaspoon  baking soda
1/2  teaspoon  baking powder
1/4  teaspoon  salt
3     ounces  Nestle Dark Chocolate Morsels

To make brown sugar substitute: Mix erythritol and blackstrap molasses in a food processor, pulsing until it is combined and looks like brown sugar.

Preheat oven to 375F. In mixing bowl add shortening, butter, peanut butter, Pyure, brown sugar mixture and egg.  Beat together until smooth.

Add almond flour, bake mix, baking soda, baking powder, and salt.  Mix together with wooden spoon.

Place chocolate morsels in food processor and process until they are small pieces.

Stir morsels into cookie dough until well combined.  Scoop by 2 tbsp. size scoop on parchment or silicone lined cookie sheet.

Bake 8 to 9 minutes or until golden brown around the edges.  They will be very soft when they come out and not look done.  Do not try to move them! Let them cool completely on cookie sheet and they will get crisp.

When completely cooled, transfer to plate with spatula or keep in ziplock bag or storage container.

Copyright:
  "Ginny Larsen, 3/9/2016"
                                    - - - - - - - - - - - - - - - - - - -

28 Cookies/Per Cookie: 106 Calories; 9g Fat (76.9% calories from fat); 2g Protein; 4g Carbohydrate; 1g Dietary Fiber


Check out Living Scriptures Devotional blog for inspirational writings

Monday, February 22, 2016

HAMBURGER-SANDWICH BUNS AND AN UPDATE


Hello peoples, once again!  I'm here with a little update about where I'm at in life, and a recipe to share.  No, I'm not back in full action as far as recipe writing/creating.  I am retired, and enjoying it.  Still low-carbing, as always, but not working on recipes to share as I once did. However, I made the decision, that once in a while, as something special happens in the kitchen, I may like to share it again.  I do love sharing all good things when I can.


What's happening in my life?  My husband was recently diagnosed with possible Alzheimer's disease. This has been very difficult for us to face, accept, and get our brains to wrap around.  In fact I still think I may be in a state of denial?  I cannot see this happening to my dear sweet hubby who has been my soul-mate for 40+ years.  When I even so much as try to read about the stages of Alzheimer's I cannot go there, because it is just too much to picture him going down that road and becoming like that.  I can't see it.  Right now he's in the stage of mild-cognitive impairment...which is stage 2 in the 7 stages, if indeed he does have Alzheimer's.  He has yet to have an MRI and a full blood workup, but with the testing they have done so far the neuro-psychologist believes this is what he has.  This Friday we have another appointment.  Needless to say, this as well as other things in my life/family take precedence over cooking, creating recipes, etc. 


I'm doing more research on Alzheimer's these days, and how to treat it.  I'm giving him MCT oil and making him coconut bomb treats now and then.  It does seem to improve his memory and concentration on the days he takes all his supplements and oil.  On the days we forget or are too hurried, he has more trouble, he repeats things to me more, he loses things more, and so forth.  I know that a ketogenic diet is something that has been known to help, and have read Dr. Mary Newport's writings, however, my husband has a will of his own and tastes of his own and has never found my low-carb lifestyle to be something he can incorporate into his own diet.  I respect his likes/dislikes and tastes. It's his choice. He loves his carbs. So with the low-carb meals I make he does eat lower than he would, but he adds his carbs when he wants them.  We work together. Yet even with the carbs in his diet, I believe the oil and supplements help.

So anyhoo, that's just a little bit of what has been happening in my life.  I'm relying on the Lord daily to see us through this time in our lives.  In everything, He intends to work something greater and higher in our lives, through every hardship or difficulty.  They just show us in the long run, His greatness and love and glory. I each day find the encouragement and strength I need in His Word, in prayer, in His indwelling presence which strengthens my heart when it wants to fail me, so that I can keep going on and being there for my family and friends. I am also working on another blog that I share the inspiration that God gives through the lessons in life, if you are like-minded, or seeking such, you can check it out here: http://livingscripturesdevotionals.blogspot.com

I'm turning on comments again for the blog, but please be patient if I do not answer a comment that you post or a question you may have.  I'm needing to spend less time on the computer. (*Updated this 2/24/2016 to say I tried turning on comments and for some reason it isn't working. Sorry about this. I'm trying to get to the bottom of it. So far blogger has not given me a good answer or solution. Will keep working on it.)

If you notice, I do have ads on my blog.  If you click on them, I get some monetary compensation from them for each click through.

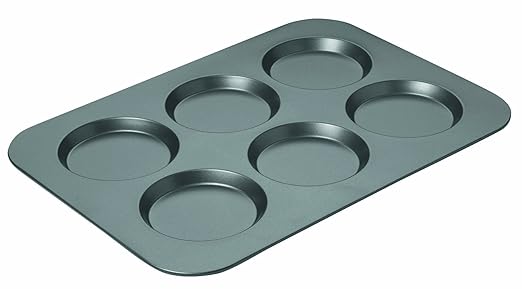
Now, here is the recipe for these lovely buns that I have been making lately, which work great to take with if you are eating out at, say, Burger King, which is where we like to go now and then, and order a low carb burger with no bun, and then just bring these along and use instead.  Works great.  I also use them in the morning for breakfast and toast in my toaster oven and make a nice egg, bacon and cheese sandwich.  Works great for any kind of sandwich you may want.  I use a muffin top pan to bake these in.
Chicago Metallic Non-Stick Original Muffin Top Pan

It really is the best for size and texture that you'll come out with. These are a spin-off of my cheese and wine bread on this blog, and an adjustment/change to the hamburger buns I originally made from that recipe. I like this one much better.  But you can decide. I have not found a bread/bun recipe that I like better so far.  I always come back to this.

                   
HAMBURGER-SANDWICH BUNS


6 tablespoons  Parmesan cheese
3 tablespoons  almond flour - Honeyville
1 tablespoon  psyllium husk powder
3/4 teaspoon  baking powder
3 eggs
3 tablespoons  water -- OR other liquid such as wine, almond milk, broth, etc.

In small bowl* add Parmesan cheese, almond flour, psyllium husk powder and baking powder.  Whisk together.

Add eggs and water and whisk until smooth.

Preheat oven to 350F. Grease 4 muffin top tins.  Pour batter evenly in each.  Bake 15 to 17 min. or until done.

Let cool completely. Slice each bun in half

*HELPFUL HINT: I put all the dry ingredients into a coffee grinder and grind for about 12 seconds to sift together and get out any lumps.  This makes a really nice texture to the buns.  You don't have to do this step but I love the way they turn out when I do.

OPTIONAL: For added "yeasty" flavor, add nutritional yeast flakes, 1 tbsp. to dry ingredients, if desired.

Copyright:
  "© Ginny Larsen, 2015"
                                    - - - - - - - - - - - - - - - - - - -

4 servings: Per Serving: 131 Calories; 9g Fat (58.3% calories from fat); 9g Protein; 5g Carbohydrate; 4g Dietary Fiber

NOTES : 1g net carb per bun


Monday, September 8, 2014

ONE MORE ANNOUNCEMENT - UPDATE

Well, due to the outpouring of responses I've been getting, I have decided I acted pretty hasty in deciding to just delete the blog entirely, though I will no longer be active in it, and no longer responding to comments once this is final, I have made the decision to leave the blog up. There will no longer be a comment section, and you can feel free to pin my recipes from the blog, however, I have deactivated my pinterest account, so any pins that were pinned from there will be gone.  I'm sorry about that.
My youtube channel will be left in tact.  I won't be adding to it though, anymore videos.  The facebook page, as I said will disappear at the end of the 14 days.

Thank you all so much for your outpouring of love and support! I'm so glad to have been a small part in your happy eating!

Sunday, September 7, 2014

SPECIAL ANNOUNCEMENT

Hello everyone out there who has enjoyed this blog and found it somewhat useful.  I am afraid this will be my last post.  I am going to shut down this blog in 14 days.  It has been a joy to share recipes with you. I began this journey for the sole purpose of sharing recipes that I love with others to try to help them do low-carb whether it was to control diabetes, lose weight, or for whatever reason. I'm afraid things have happened lately, that has taken away the joy of sharing recipes for me.  I tried pulling myself away several months ago, and I guess I should have listened to myself then!  I came back only to find myself having once again, to see, that I am not to be doing this.

So, in 14 days, the facebook page, and the blog will be gone. So if you have enjoyed my recipes and find them helpful, please feel free to copy, print out, or share any of the recipes you find on the page.  I put them there for you, my friends, for your use.  Please feel free to use them.  Take what you want before the 14 days, because they'll be gone then.

Thank you all who have been supporters, and who have been so kind, and those who found help from this blog, I'm happy that it served that purpose for the time it did.  There are many other food bloggers out there with so many good recipes, and there's no shortage anymore of whatever recipe you want for whatever type of eating you do!  I'm happy that I could be a small part of bringing some joy and good taste to your life.

God bless,
Ginny

Monday, August 18, 2014

HOMEMADE LOW CARB FROZEN SNICKER BARS


I wanted so badly to come up with a good Snicker bar recipe! Ok, it's not an exact replica, but it's my version of a low-carb Snicker bar, and it was so rich, and so yummy, and so addictive that I hesitate to post it, because it is really hard to eat just one.  It really is.  You have fair warning!  Make this ONLY when you are having lots of company to share it with, because you will want to keep eating them. I added peanut butter to the caramel layer in this.  I did so mainly because I didn't make enough of the caramel layer and didn't want to double it, so instead I thought adding some peanut butter to it would be great.  It was.  I'm glad I made that decision.  It's a bit time consuming to make, but not difficult.  You have to make it in layers, and you have to wait between layers for it to freeze.  So it is something you'll want to plan to make a day ahead or well enough ahead so that it has time to freeze.  The creamy layer has more chocolate to it than a real Snicker's bar, but I liked that also, so maybe I should rename it or something, but for now I'm calling it a Snicker's bar, because that's what it was patterned after.

Maybe I should call it a "Ginster's bar".  (My hubby calls me Ginster sometimes).  But that's sort of dorky.  So I'll stick with Snicker for now.

                   
HOMEMADE LOW CARB FROZEN SNICKER BARS

Cream Filling
7 5/8 ounces  Nestle Media Crema (Table Cream) -- (1 can)-available in Mexican section of Walmart
1/3 cup  powdered sweetener of your choice -- (powder granulated sweetener in coffee grinder)
8 pieces  Lindt 85% Cocoa Bar -- chopped
2 cups  LC-Marshmallow Fluff Mix -- prepared as directed
4 ounces  cream cheese
20 drops  Marshmallow flavor drops, Capella -- (optional, but adds to the flavor)
Caramel/Peanut Butter Layer
1/4 cup  butter
1/4 cup  granulated erythritol or xylitol based sweetener of choice
1/4 teaspoon  blackstrap molasses (OR dark molasses)
2 tablespoons  half and half -- (OR heavy cream)
1/4 cup  natural peanut butter -- (no sugar added)
1/2 cup  peanuts, dry-roasted -- salted
Chocolate Coating
2 ounces  unsweetened chocolate squares -- chopped
1/4 cup  coconut oil
1/3 cup  powdered sweetener of choice

Cream Filling: In medium saucepan, add table cream and powdered sweetener. Heat to almost a boil. Turn off heat and stir in chocolate pieces.  Stir with wire whisk until smooth and creamy. Place pan in an ice bath for 5 min. whisking all the while.

 Add the marshmallow fluff, cream cheese, and Capella drops and beat until smooth and creamy.  Pour into an 8x8 pan lined with nonstick foil.  Place in freezer until firm.

Caramel/Peanut Butter Layer: In heavy medium saucepan, add butter, granulated sweeteners, and blackstrap molasses.  Stir over high heat until butter is melted and mixture is very bubbly.  Turn down heat to medium and very, very slowly, just a little at a time, add the half and half, OR cream, while whisking vigorously. When all the cream is added, keep whisking and cooking for about 2 more minutes. Remove from heat. Add peanut butter and beat until smooth and creamy with electirc mixer.

 Stir in nuts.  Pour on top of frozen cream filling. Freeze until firm about 1 hour.

Chocolate Coating: In a small bowl place chocolate pieces, coconut oil, and powdered sweetener.  Microwave 30 seconds, stir, if needed  microwave again in 15 sec. increments, stirring in between, until melted and smooth.

Remove bars from pan. Cut into 16 squares and dip into the melted dark chocolate. Lay out on wax paper lined sheet and keep frozen.

                                  - - - - - - - - - - - - - - - - - - -

16 Servings: Per Serving: 250 Calories; 21g Fat (83.2% calories from fat); 4g Protein; 6g Carbohydrate; 2g Dietary Fiber

NOTES : 4g net carbs


Also check out my other blog: Living Scriptures Devotionals

Thursday, August 14, 2014

STUFFED TURNIPS


This post has been a long time coming.  I don't know why I haven't posted it before because these have been among my very favorite and very special side dishes for as long as I've been low-carbing. I got the original recipe idea from a vegetable recipe book, and sort of took it from there and added my own touches and made it my own recipe.  I can't for the life of me remember the name of the cookbook. It was one I picked up at a thrift store, which is where I do most of my shopping.


This is the kind of side dish that makes you feel like you're having a really special gourmet meal.  Like something you'd pay a lot of money for eating out. If you are missing the twice-baked potato, or loaded baked potato, you won't anymore. I promise you.

One little hint when choosing turnips...the smaller ones are less bitter.  If you can find a bag with 4 turnips all pretty close to the same size that's what works best for this.  They usually come in a 1 lb. bag.  At least here they do.
                   
STUFFED TURNIPS
                         
1 pound  turnips -- (4 medium sized) - peeled, whole
1/4 cup  Parmesan cheese
1 1/2 tbsp Colby jack cheese -- shredded
1/4 cup  mushrooms -- chopped fine
1/2 teaspoon  garlic powder
1/2 teaspoon  onion powder
 salt and pepper -- to taste
2 tablespoons  butter -- melted
Bacon pieces (optional)

In a saucepan, boil whole turnips for 30 minutes or until soft enough to easily scoop, (will vary with size of turnip). Remove from pan and let cool enough to handle. Preheat oven to 375F.

With a melon ball scoop, or a small spoon, very carefully scoop out the center of each turnip, being careful not to go through the sides or bottom, so you are left with a shell to fill.

Place scoopings of turnip into a food processor, and process until it becomes small pieces (or chop by hand with a knife until very fine). Add this to a mixing bowl along with Parmesan cheese, Colby jack cheese, mushrooms, garlic powder, onion powder, and salt and pepper.

Mix together well and fill each turnip. You'll have a lot of filling so just fit it in each one even overflowing, as best you can.  Top with bacon pieces if desired (optional). Drizzle melted butter over each turnip. Bake 30 to 40 minutes or until lightly browned on top.


Copyright:
  "© Ginnys Low Carb Kitchen, 8/14/2014"
                                    - - - - - - - - - - - - - - - - - - -

4 Servings/Per Serving:  112 Calories; 8g Fat (63.8% calories from fat); 4g Protein; 7g Carbohydrate; 2g Dietary Fiber; (5g net carbs)


LinkWithin

Related Posts Plugin for WordPress, Blogger...